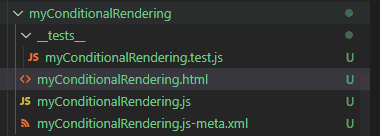
Conditional Rendering testing
In this blog you will learn the following topics
- How to create a test file
- How to run a test file
- How to test Conditional rendering
- How to test on change event
- How to use beforeEach block
Create a LWC component for testing
- First create a component called
myConditionalRendering - Add the following code to the
myConditionalRendering.js,myConditionalRendering.htmlandmyConditionalRendering.js-meta.xmlfiles
import { LightningElement, track } from 'lwc';

export default class MyConditionalRendering extends LightningElement {
    @track isVisible = false;

    changeHandler(event) {
        this.isVisible = event.target.checked;
    }
}<template>
<lightning-card title="MyConditionalRendering" icon-name="custom:custom14">
<div class="slds-var-m-around_medium">
<lightning-input type="checkbox" label="Show pasword"
onchange={changeHandler}></lightning-input>
<div class="slds-var-m-vertical_medium userInfo">
<template if:true={isVisible}>
My Password is Nikhilkarkra
</template>
<template if:false={isVisible}>
My Password is **********
</template>
</div>
</div>
</lightning-card>
</template><?xml version="1.0" encoding="UTF-8"?>
<LightningComponentBundle xmlns="http://soap.sforce.com/2006/04/metadata" fqn="templateToggleDemo">
<apiVersion>49.0</apiVersion>
<isExposed>true</isExposed>
<targets>
<target>lightning__AppPage</target>
<target>lightning__RecordPage</target>
<target>lightning__HomePage</target>
</targets>
</LightningComponentBundle>The component we have created has a isVisible property which is initialized with value false. In template we are using if:true and if:false directive to hide and show the content. Also we have a lightning-input checkbox field which has a onchange event which call the changeHandler event handler. changeHandler event handler update the value of isVisible property.
Create Your Jest Test File
- Add a
__tests__folder under your component - Add
__tests__folder to.forceignoreso that it’s not deployed to your org - Create a file with your component name
myConditionalRendering.test.jsand give an extension.test.jsas shown below.

Create Your test cases for the component
import { createElement } from 'lwc';
import MyConditionalRendering from 'c/myConditionalRendering';

describe('c-my-conditional-rendering suite', ()=>{

    beforeEach(() => {
        const element = createElement('c-my-conditional-rendering', {
            is: MyConditionalRendering
        })
        document.body.appendChild(element)
    })
    it("don't show the password", ()=>{
        const element = document.querySelector('c-my-conditional-rendering')
        const passwordElement = element.shadowRoot.querySelector('.userInfo')
        expect(passwordElement.textContent).toBe('My Password is **********')
    })

    it("show user password when checkbox is checked", ()=>{
        const element = document.querySelector('c-my-conditional-rendering')
        const inputElement = element.shadowRoot.querySelector('lightning-input');
        inputElement.checked = true
        inputElement.dispatchEvent(new CustomEvent('change'))
        return Promise.resolve().then(()=>{
            const passwordElement = element.shadowRoot.querySelector('.userInfo')
            expect(passwordElement.textContent).toBe('My Password is Nikhilkarkra')
        })
    })


})
In line 1. we are importing the createElement method from the lwc that will help us to create a new element
In line 2. We are importing our MyConditionalRendering from the path ie. c/myConditionalRendering
In line 4. We have created the describe block for organizing test cases in logical groups of tests. We have given the name c-my-conditional-rendering suite name to the describe block and within this block, we are writing our test cases
In line 6-11 We have created the beforeEach block. This blocks Runs before each of the tests in this file runs. Within this block, we are creating the element using createElement method and loading the HTML of our myConditionalRendering component within the element that we are creating. Once element is ready, we are attaching the element to the JSDOM body tag.
In line 12-16 We have created test block in which we are going to test that the element with class userInfo content is My Password is ********** when isVisible property is false
In line 18-29 We have created test block in which we are going to test that the element with class userInfo content is My Password is Nikhilkarkra when isVisible property is get's changed on triggering the onchange event. We are using the Promise.resolve() to make sure onChange event has updated the DOM because DOM updation is an asynchronous process.
Run Your test cases
You can run your test case using the following command
npm run test:unit -t myConditionalRendering.test.js // this command for running single file

npm run test:unit // this command for running all the test files
Output
After running the test cases you will see the following output

