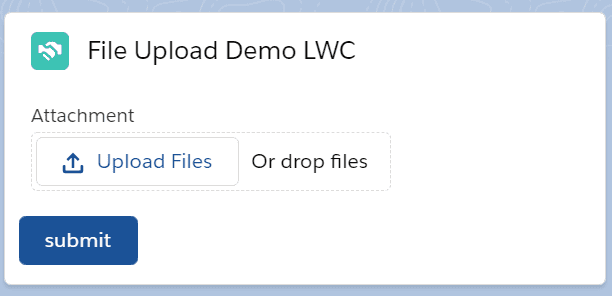
Custom File Upload Using LWC
You will learn the following things
- How to fetch the file details
- How to fetch the record id
- How to avoid specific file type
- How to send a data stream to Apex
- How apex catch the file from lwc and store it.
- How to handle success message using toast
Video Tutorial
Steps and code
- Create Lwc component
fileUploaderCompLwcand add the following code to the respective files.
fileUploaderCompLwc.html
<template>
    <lightning-card title="File Upload Demo LWC" icon-name="custom:custom14">
        <div class="slds-m-around_medium">
            <lightning-input type="file"
            accept=".xlsx, .xls, .csv, .png, .doc, .docx, .pdf"
            label="Attachment" onchange={openfileUpload}></lightning-input>
        </div>
        <template if:true={fileData}>
            <p>{fileData.filename}</p>
        </template>
        <lightning-button variant="brand" label="submit" title="Submit" onclick={handleClick} class="slds-m-left_x-small"></lightning-button>
    </lightning-card>
</template>- In the
fileUploaderCompLwc.htmlwe are creating the card component and within the card creating two elements,lightning-inputandlightning-button - We are using
lightning-inputof typefilewhich will allow us to choose a file from the system. - In the input field, we are using the file format that will be only visible to the user while uploading the file
- Once the File upload, we call the
onchangeevent that will callopenfileuploadhandler. - Once the file gets uploaded to javascript will extract the filename and show on the HTML
- We have
lightning-buttonof type submit onclick of which we are calling the apex method.
fileUploaderCompLwc.js
import { LightningElement, api } from 'lwc';
import { ShowToastEvent } from 'lightning/platformShowToastEvent';
import uploadFile from '@salesforce/apex/FileUploaderClass.uploadFile'
export default class FileUploaderCompLwc extends LightningElement {
    @api recordId;
    fileData
    openfileUpload(event) {
        const file = event.target.files[0]
        var reader = new FileReader()
        reader.onload = () => {
            var base64 = reader.result.split(',')[1]
            this.fileData = {
                'filename': file.name,
                'base64': base64,
                'recordId': this.recordId
            }
            console.log(this.fileData)
        }
        reader.readAsDataURL(file)
    }

    handleClick(){
        const {base64, filename, recordId} = this.fileData
        uploadFile({ base64, filename, recordId }).then(result=>{
            this.fileData = null
            let title = `${filename} uploaded successfully!!`
            this.toast(title)
        })
    }

    toast(title){
        const toastEvent = new ShowToastEvent({
            title,
            variant:"success"
        })
        this.dispatchEvent(toastEvent)
    }
}- In
fileUploaderCompLwc.js, we are fetching the record id using@api, and this id is required to send the file to the apex. - As soon as the file upload onchange, we call
openfileUploadhandler that receives aneventfrom which we extract the details of the file like name, size, etc. - Inside
openfileUploadmethod, we use browser FileReader API to generate the data stream. - On click of the submit button,
handleClickmethod gets called, and it calls the apex methoduploadFile. - Once the file upload is completed, it will trigger the
toastmethod that shows the screen's success message.
fileUploaderCompLwc.js-meta.xml
<?xml version="1.0" encoding="UTF-8"?>
<LightningComponentBundle xmlns="http://soap.sforce.com/2006/04/metadata">
    <apiVersion>48.0</apiVersion>
    <isExposed>true</isExposed>
    <targets>
        <target>lightning__RecordPage</target>
    </targets>
</LightningComponentBundle>- Create an Apex class
FileUploaderClass.clsand add the following code to the file.
FileUploaderClass.cls
public with sharing class FileUploaderClass {
    /*
   * @method uploadFile()
   * @desc Creates a content version from a given file's base64 and name
   *
   * @param {String} base64 - base64 string that represents the file
   * @param {String} filename - full file name with extension, i.e. 'products.csv'
   * @param {String} recordId - Id of the record you want to attach this file to
   *
   * @return {ContentVersion} - returns the created ContentDocumentLink Id if the
   *   upload was successful, otherwise returns null
   */
   @AuraEnabled
  public static String uploadFile(String base64, String filename, String recordId) {
        ContentVersion cv = createContentVersion(base64, filename);
        ContentDocumentLink cdl = createContentLink(cv.Id, recordId);
        if (cv == null || cdl == null) { return null; }
        return cdl.Id;
  }
  /*
   * @method createContentVersion() [private]
   * @desc Creates a content version from a given file's base64 and name
   *
   * @param {String} base64 - base64 string that represents the file
   * @param {String} filename - full file name with extension, i.e. 'products.csv'
   *
   * @return {ContentVersion} - returns the newly created ContentVersion, or null
   *   if there was an error inserting the record
   */
  private static ContentVersion createContentVersion(String base64, String filename) {
    ContentVersion cv = new ContentVersion();
    cv.VersionData = EncodingUtil.base64Decode(base64);
    cv.Title = filename;
    cv.PathOnClient = filename;
    try {
      insert cv;
      return cv;
    } catch(DMLException e) {
      System.debug(e);
      return null;
    }
  }

   /*
   * @method createContentLink() [private]
   * @desc Creates a content link for a given ContentVersion and record
   *
   * @param {String} contentVersionId - Id of the ContentVersion of the file
   * @param {String} recordId - Id of the record you want to attach this file to
   *
   * @return {ContentDocumentLink} - returns the newly created ContentDocumentLink,
   *   or null if there was an error inserting the record
   */
  private static ContentDocumentLink createContentLink(String contentVersionId, String recordId) {
              if (contentVersionId == null || recordId == null) { return null; }
    ContentDocumentLink cdl = new ContentDocumentLink();
    cdl.ContentDocumentId = [
      SELECT ContentDocumentId
      FROM ContentVersion
      WHERE Id =: contentVersionId
    ].ContentDocumentId;
    cdl.LinkedEntityId = recordId;
    // ShareType is either 'V', 'C', or 'I'
    // V = Viewer, C = Collaborator, I = Inferred
    cdl.ShareType = 'V';
    try {
      insert cdl;
      return cdl;
    } catch(DMLException e) {
      System.debug(e);
      return null;
    }
  }
}
Final Output
Now place your component to the record page. You will see the following output


